Donkey Car trained with Double Deep Q Learning (DDQN) in Unity Simulator.
1. Introduction
Donkey Car is an open source DIY self driving platform for small scale RC cars. For those of you who want to know more about self driving but without the knowledge or background to build one, the platform provides all the necessary details to build one yourself. It covers both the hardware and software stack. Following the guide, I was able to assemble the car without any prior background in hardware.
Right now, the most common methods to train the car to perform self driving are behavioral cloning and line following. On a high level, behavioral cloning works by using a convolutional neural network to learn a mapping between car images (taken by the front camera) and steering angle and throttle values through supervised learning. The other method, line following, works by using computer vision techniques to track the middle line and utilizes a PID controller to get the car to follow the line. I tried both methods and they work!!!
Donkey Cars trained with Behavioral Cloning to avoid obstacles
(Video taken at local Donkeycar Meetup in Hong Kong on May 12, 2018)
2. Train Donkey Car with Reinforcement Learning
Essentially, the goal of Donkey Car is to build the fastest self driving car to compete in a race (fastest time to complete a single lap on a track). I thought reinforcement learning would be a great method to train a racing car. We only need to design a reward that maximizes the car’s velocity while having it stay within the track region, and let the algorithm figure out the rest. Sounds easy enough? In reality however, training reinforcement learning in a physical setting is proven to be very challenging. Reinforcement learning essentially learns by trial and error, it is very hard, if not impossible, to have the car drives randomly for hours in the real world and wait (or pray) for it to start learning before crashing into pieces. Training duration is an issue too, since it is not uncommon for RL agents to train for hundreds of episodes before it starts to pick up the learning signals. Hence, reinforcement learning is rarely performed in a physically setting.
3. Simulation to Reality
Recently, there are some studies on simulation to reality, that is, to first train the car in a virtual simulator using reinforcement learning and then transfer the trained agent to the real world. For example, OpenAI recently trained a human-like dexterous robot hand to manipulate physical objects, and the entire training was conducted in simulation; In another experiment, Google Brain trained a Quadruped Robot (Ghost Robotics Minitaur) to learn agile locomotion using simulation to reality techniques. The control policy was learned in a physics simulator and then successfully deployed on the real robot. Hence, it looks like in order to train Donkey Car with reinforcement learning, a feasible approach is to have it trained in simulation first then port the learned policy to the real car.
OpenAI trained Dexterous Robot Hand with RL in simulation and transfered the policy to the real world to manipulate physical cube
4. Donkey Car Simulator
The first step is to create a high fidelity simulator for Donkey Car. Fortunately, someone from the Donkey Car community has generously created a Donkey Car simulator in Unity. However, it is specifically designed to perform behavioral learning (i.e. save the camera images with the corresponding steering angles and throttle values in a file for supervised learning), but not cater for reinforcement learning at all. What I was expecting is an OpenAI gym like interface where I can manipulate the simulated environment through calling reset() to reset the environment and step(action) to step through the environment. Well, I decided to start with the existing Unity simulator and make some modifications to make it compatible with reinforcement learning.
4.1. Establish a way to get Python communicate with Unity
Since we are going to write our reinforcement learning code in python, we have to first figure out a way to get python communicate with the Unity environment. It turns out that the Unity simulator created by Tawn Kramer also comes with python code for communicating with Unity. The communication is done through the Websocket protocol. Websocket protocol, unlike HTTP, allows two way bidirectional communication between server and client. In our case, our python “server” can push messages directly to Unity (e.g. steering and throttle actions), and our Unity “client” can also push information (e.g. states and rewards) back to the python server.
In additional to Websocket, I also briefly considered using gRPC. gRPC is a high performance server-client communication framework open sourced by Google in late August 2016. It is adopted by Unity as the communication protocol for its ml-agents plugin. However, its set up is a bit cumbersome (i.e. need to define the RPC data structures and methods in protobuf format) and the performance gain isn’t worth it. So I’ve decided to stick with Websocket.
4.2. Create a customized OpenAI gym environment for Donkey Car
The next step is to create an OpenAI gym like interface for training reinforcement learning algorithms. For those of you who are have trained reinforcement learning algorithms before, you should be accustomed to the use of a set of API for the RL agent to interact with the environment. The common ones are reset(), step(), is_game_over(), etc. We can customize our own gym environment by extending the OpenAI gym class and implementing the methods above.
The resulting environment is compatible with OpenAI gym. We can interact with the Donkey environment using the familiar gym like interface:
env = gym.make("donkey-v0")
state = env.reset()
action = get_action()
state, reward, done, info = env.step(action)
The environment also allows us to set frame_skipping and train the RL agent in headless mode (i.e. without Unity GUI).
In the meantime, there are 3 Unity scenes available (created by Tawn Kramer): generated roads, warehouse, and Sparkfun AVC for training. Before we start running our own RL training algorithm, we have to either build the Donkey Car Unity environment ourselves (need to install Unity) or download the pre-built environment executables. Detailed instructions of how to set up the environment for training with RL can be found in my github page here.
4.3. Train Donkey Car with Double Deep Q Learning (DDQN) using the environment
With the RL friendly environment in place, we are now ready to build our own reinforcement algorithm to train our Donkey Car in Unity! I’ve implemented the Double Deep Q Learning (DDQN) algorithm with Keras. This is the classic RL algorithm developed by DeepMind to play Atari and is well tested and relatively simple to code up. I’ve tested the implementation in OpenAI gym cartpole and VizDoom so if there is anything bad happen it should be the Unity environment but not the algorithm. I am not going to go through how DQN works here. For those of you who are interested, feel free to check out my previous blog post on DQN or this excellent post.
4.3.1. State Space
We take the pixel images taken by the front camera of the Donkey car, and perform the following transformations:
- Resize it from (120,160) to (80,80)
- Turn it into grayscale
- Frame stacking: Stack 4 frames from previous time steps together
The final state is of dimension (1,80,80,4).
4.3.2. Action Space
Both the Donkey car in the real world and the Donkey car in the simulator takes continuous steering and throttle values as input. For simplicity sake, we set throttle value as constant (i.e. 0.7) and only opt to control the steering. The steering value ranges from -1 to 1. However, DQN can only handle discrete actions, so I discretized the steering value into 15 categorical bins.
4.3.3. Q Network Architecture
Our Q network is a 3-layer convolutional neural network that takes stacked frame states as input and output 15 values representing the 15 discretized steering categories.
4.3.4. Rewards
Reward is a function of cross track error (cte) which is provided by the Unity environment. Cross track error measures the distance between the center of the track and car. Our shaped reward is given by the following formula:
\[reward = 1 - (abs(cte) / max\_cte)\]Where \(max\_cte\) is just a normalizing constant so that the reward is within the range of 0 and 1. We terminate the episode if \(abs(cte)\) is larger than \(max\_cte\).
* Edit: I’ve found that using a reward function: \(reward = abs(prev\_cte) - abs(cte)\) works even better. The resulting agent converged to a good policy in ~30 episodes as compared to 100 episodes for the reward above.
4.3.5. Other notable variables
Frame skipping is set to 2 to stabilize training. Memory replay buffer (i.e. storing <state, action, reward, next_state> tuples) has a capacity of 10000. Target Q network is updated at the end of each episode. Batch size for training the CNN is 64. Epsilon-greedy is used for exploration. Epsilon is initially set to 1 and gradually annealed to a final value of 0.02 in 10,000 time steps.
4.3.6. Results
With the setup above, I trained DDQN for around 100 episodes on a single CPU and a GTX 1080 GPU. The entire training took around 2 to 3 hours. As we can see from the video below, the car was able to learn a pretty good policy to drive itself!
Notice that the car learned to drive and stayed at the center of the track most of the time.
5. Lane Segmentation to cut out background noise
Essentially, we want our RL agent to base its output decision (i.e. steering) only on the location and orientation of the lane lines and neglect everything else in the background. However, since we give it the full pixel camera images as inputs, it might overfit to the background patterns instead of recognizing the lane lines. This is especially problematic in the real world settings where there might be undesirable objects lying next to the track (e.g. tables and chairs) and people walking around the track. If we ever want to transfer the learned policy from the simulation to the real world, we should get the agent to neglect the background noise and just focus on the track lines.
To address this problem, I’ve created a pre-processing pipeline to segment out the lane lines from the raw pixel images before feeding them into the CNN. The segmentation process is inspired by this excellent blog post. The procedure is described as follows:
- Detect and extract all edges using Canny Edge Detector
- Identify the straight lines through Hough Line Transform
- Separate the straight lines into positive sloped and negative sloped (candidates for left and right lines of the track)
- Reject all the straight lines that do not belong to the track utilizing slope information
The resulting transformed images consists of 0 to 2 straight lines representing the lane, illustrated as follows:
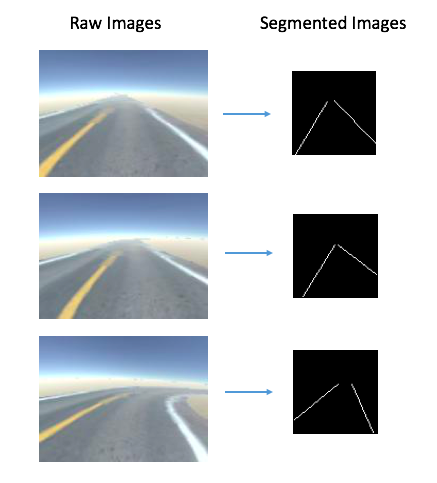
I then took the segmented images, resize them to (80,80), stack 4 successive frames together and use it as the new input states. I trained DDQN again with the new states. The resulting RL agent was again able to learn a good policy to drive the car!
However, I’ve noticed that not only training took longer, but the learned policy was also less stable and the car wriggled frequently especially when making turns. I think this happened because we threw away useful background information and line curvature information. In return, the agent should be less prone to overfitting and can even be generalize to unseen and real world tracks.
6. The Next Steps:
In this blog post, I’ve introduced an OpenAI gym compatible environment for training Donkey car in Unity simulator with reinforcement learning. I’ve also successfully trained the car to drive itself using Double Deep Q Learning. But this is far from done. Below are things that I am planning to do next.
6.1. Train the car to maximize speed with Reinforcement Learning
Right now the RL agent only generates steering output, with the throttle value held fixed. The next step will be to have the agent learn to output a throttle value as well to optimize vehicle speed. For example, it should learn to increase throttle when the vehicle is driving straight and decrease throttle when the vehicle is making sharp turns. To achieve this, we need to further shape the reward with vehicle velocity.
6.2. Simulation to Reality
Another interesting task is to transfer the learned policy from the simulator to the real world. Closing the reality gap is no easy task. One way to achieve this is to utilize the lane segmentation trick as covered earlier to obtain a unified representation of the input states for both the simulated and real worlds. Other commonly adopted sim-to-real tricks involved domain randomization (e.g. randomizing the width, color, friction of the track, adding shadows, randomizing throttle values, etc) so that the learned policy is robust enough to be deployed to the real world.
7. Source Code
The source code for the simulator and reinforcement learning implementations are hosted on github and can be found here.
8. Acknowledgement
I want to thank Tawn Kramer for creating a high fidelity Unity simulator for Donkey car. What I did was modifying his existing code to make it reinforcement learning compatible. I also want to thank the Donkey car community for initiating this wonderful project for me to learn about self driving!
If you have any questions or thoughts feel free to leave a comment below.
You can also follow me on Twitter at @flyyufelix.